이제는 AI 없이 코딩하는 것은 매우 비효율적입니다. 여러 조사 결과처럼 AI 도구들은 개발자의 생산성을 향상시켜 줍니다. 그러나 저처럼 무료 사용자는 Cloud quota를 금방 소진해서, 추가적인 방법이 필요 합니다. 또한 보안이 중요한 프로젝트에서는 코드를 외부로 전송할 수 없어 로컬 LLM이 필수입니다.
GPU 없이, AI 사용하기
대형 기업이라면, 자체적인 GPU 센터 및 자체 모델 또는 OSS 모델을 이용해서 구축할 수 있습니다. 하지만 개인 개발자에게는 GPU 비용이 부담스럽습니다.
Qwen-coder 모델을 사용해 보았는데, 최소 30B 모델은 되어야 쓸만했습니다. 30B 모델을 CPU만으로 실행하면 추론 속도가 너무 느려서 실제 코딩에 사용하기 어렵습니다.
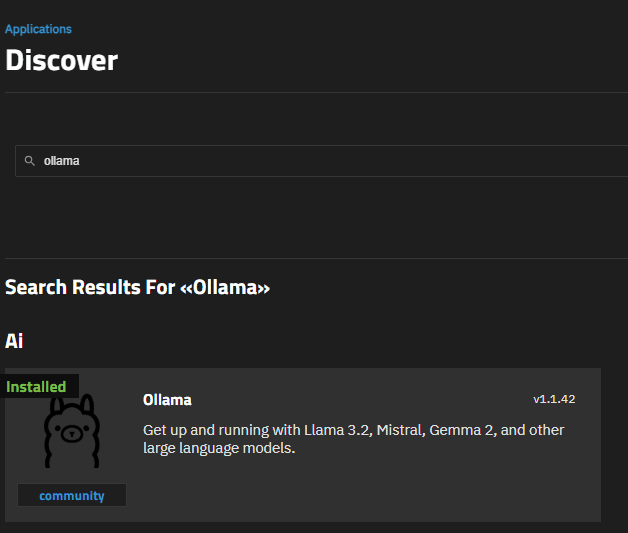
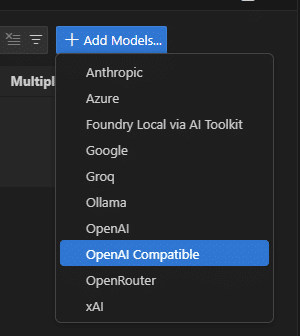
OLLAMA – Cloud 모델 사용하기
OLLAMA란? Ollama is the easiest way to get up and running with large language models such as gpt-oss, Gemma 3, DeepSeek-R1, Qwen3 and more.
OLLAMA는 여러 LLM을 사용할 수 있게 해줍니다. 특히 최근 버전부터 Cloud 모델을 지원하고 있습니다.
Cloud 모델은 로컬에는 얇은 레이어만 설치하고, 실제 추론은 Ollama 서버에서 동작합니다. 이 방식을 사용하면 480B 같은 초대형 모델도 로컬에서 사용 가능합니다.
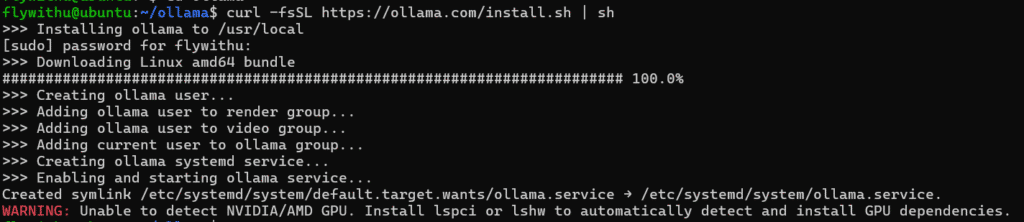
OLLAMA 설치 하기 – Linux CLI 기준
# OLLAMA 설치
curl -fsSL https://ollama.com/install.sh | sh
# Cloud 모델 다운로드
ollama pull qwen3-coder:480b-cloud
# Ollama 로그인
ollama signin
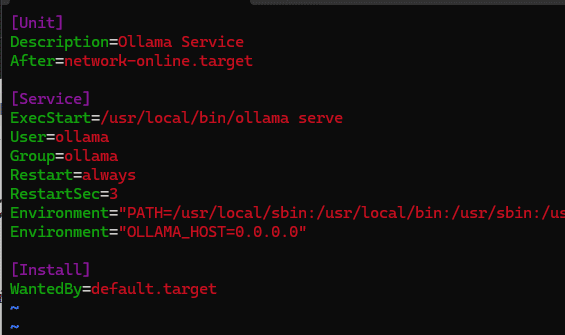
# 외부 접속 설정
sudo nano /etc/systemd/system/ollama.service
Environment="OLLAMA_HOST=0.0.0.0"
sudo systemctl daemon-reload
sudo systemctl restart ollama
윈도우 사용자의 경우:
https://ollama.com/download/windows 에서 Windows용 설치 파일을 다운로드하여 설치하시면 됩니다.
참고:
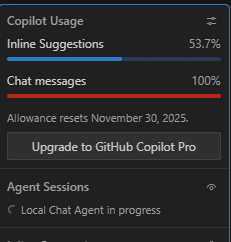
로컬 설치 없이 Ollama API로 직접 접근하는 방법도 고려했으나, Python에서는 가능했지만 VS Code Copilot 설정에서는 해당 옵션을 찾지 못했습니다.
VS Code설정 하기
Ctrl + Shift + P를 눌러 User Settings를 엽니다.

"github.copilot.chat.byok.ollamaEndpoint": "http://192.168.10.90:11434"

NAS나 Docker 환경에서도 동일하게 설정 가능합니다.
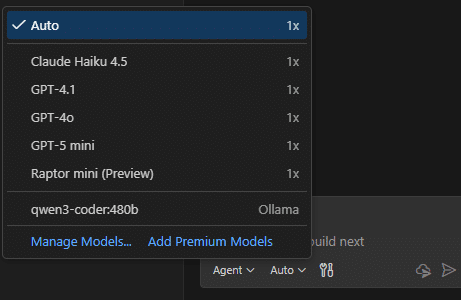
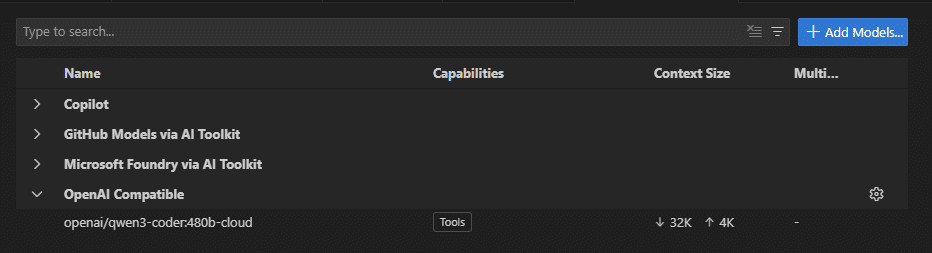
이제 VS Code에서 copilot 에서 보면 qwen3-coder 480b 가 보입니다. 이제 Qwen3-coder를 사용할수 있습니다.
테스트 영상은 아래와 같습니다.
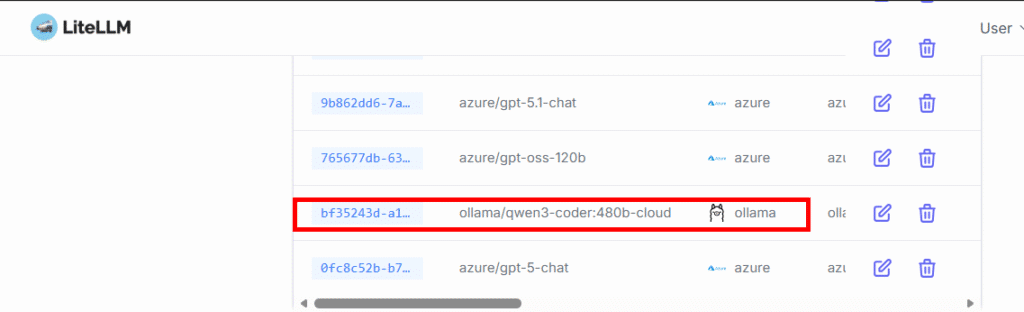
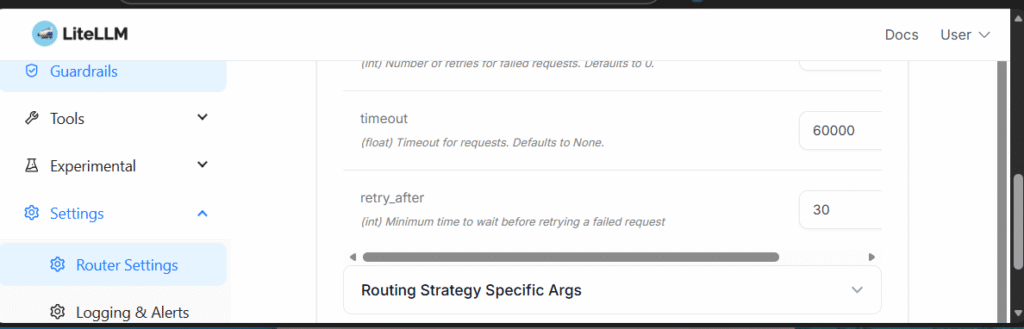
LiteLLM 으로 확장 하기
저는 Ollama를 LiteLLM Proxy를 경유해서 사용합니다. LiteLLM은 여러 LLM 제공자를 통합 관리할 수 있는 프록시 서버입니다.
이렇게 사용하면 여러 장점이 있습니다. AI를 자주 사용할 때 발생하는 429 에러(Too Many Requests)를 줄일 수 있습니다. routing 옵션을 추가하면 재시도를 자동으로 처리해주기 때문입니다. 또한 fallback 모델들을 추가하면 한 모델이 실패해도 다른 모델이 대체하여 작업을 완료할 수 있습니다.
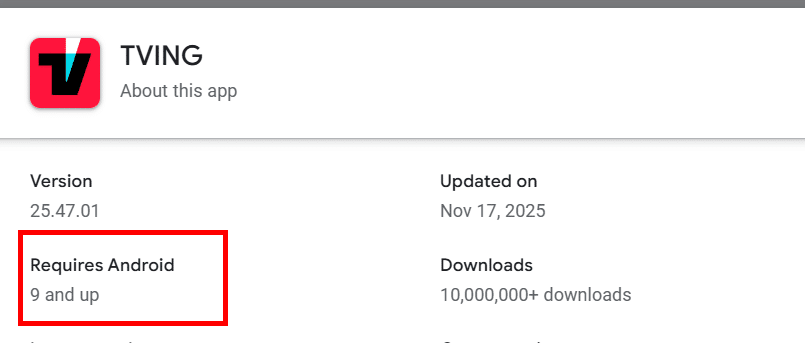
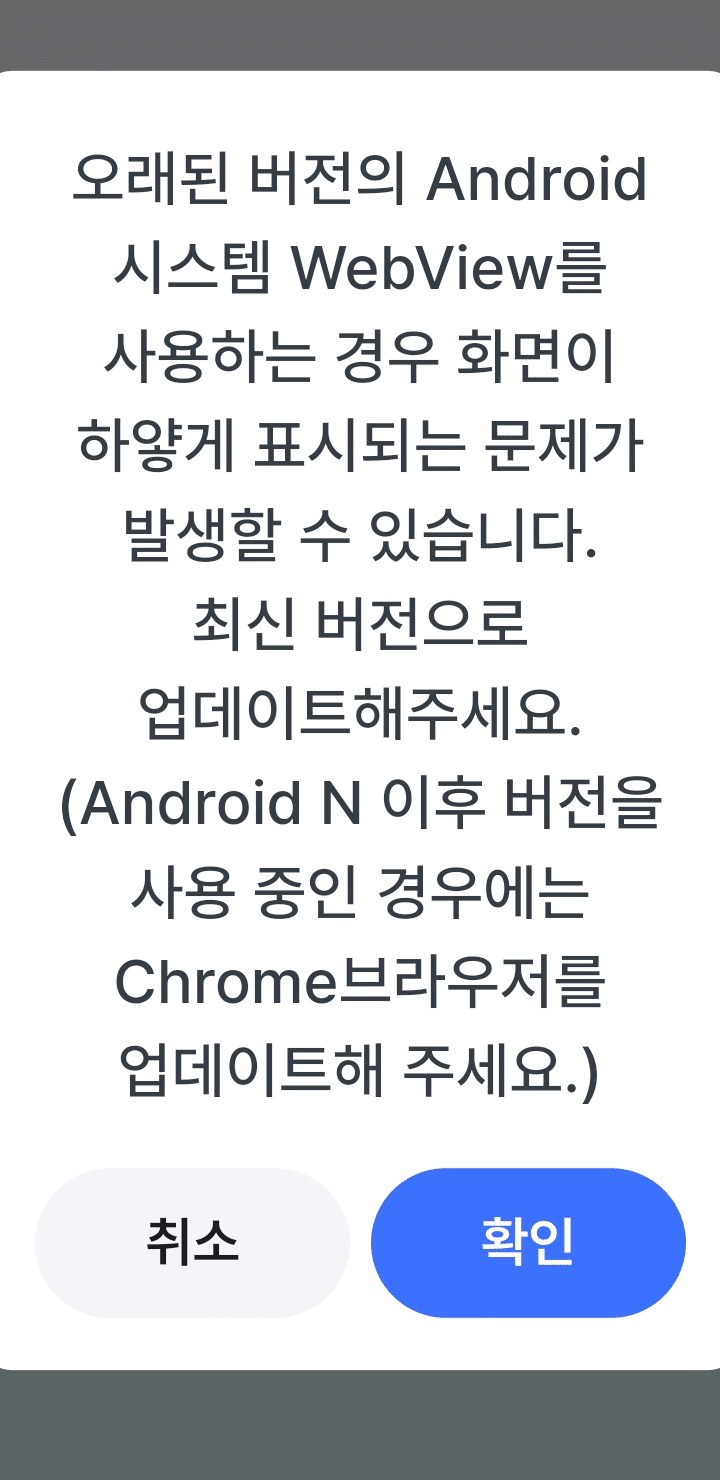
구형 폰으로 OTT 앱 테스트, TVING 만 문제 갤럭시 플립 터치 불량으로 iPhone을 고민했지만, 워치 호환성문제로 10년 된 S9+를 꺼냈습니다. 디즈니+, 넷플릭스, 쿠팡 플레이는 잘 되지만, TVING만 안드로이드 9을 지원한다는데, 로그인 조차 안되었습니다. (플립/폴더블은 2~3년 쓰기 힘들다.)
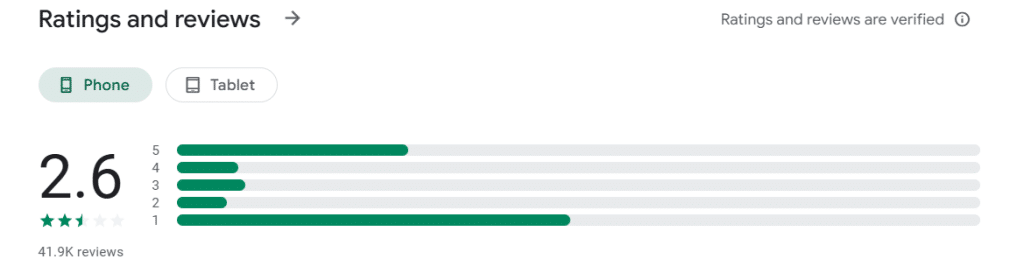
– 다른 OTT들은 다 잘 되는데 TVING 만 안되는 것이 이상해서 Play Store를 다시 들어가 보니, 평점 2.6의 위엄을 가진 앱이었습니다. (저 댓글은 내가 쓴거 아님… vs. disney: 4.4, netflix: 3.7)
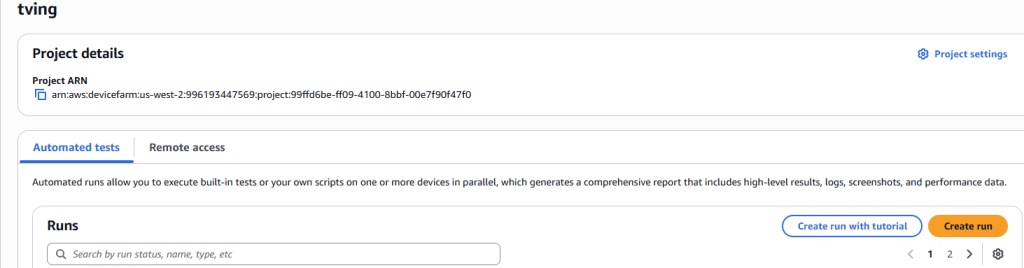
2. 정말 내 폰만 안되는 걸까? 테스트 시작 “아무리 평점이 낮아도, 지원한다고 했으면 내 폰에서 로그인은 하고, 사소한 문제가 있어야지. 도대체 왜 동작 안하는거냐.”는 생각이 들었고, AWS Device Farm이 떠올랐습니다. 1000분 무료 사용이기도 해서 한번 테스트 해봤습니다. – AWS Device Farm은 Amazon 에서 Mobile App 테스팅 서비스. iOS/Android 지원. Facebook이 사용한다고 널리 알려진 서비스.
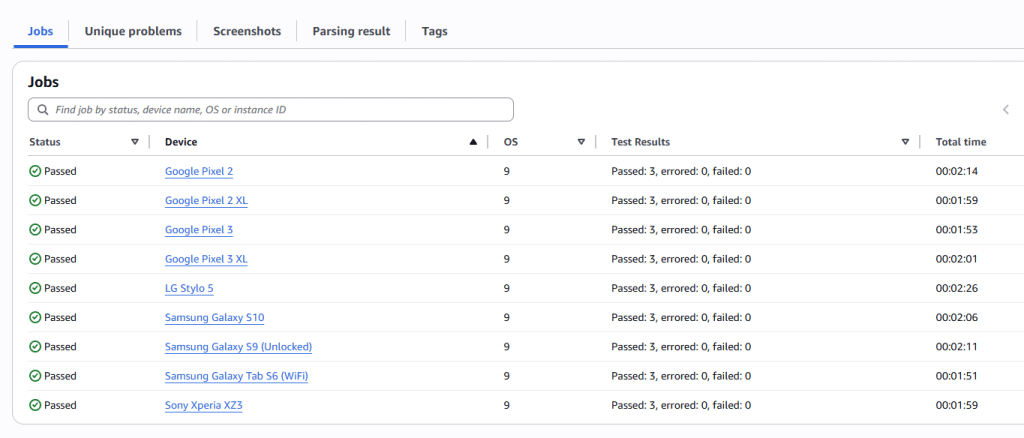
3. Appium으로 다양한 기기 테스트 지금까지 안드로이드 테스트는 UiAutomator를 이용했는데, AWS는 Appium의 사용이 일반적인 것 같아서, Appium으로 했습니다. 확실히 UiAutomator보다 환경이 좋습니다. Test Code 검증을 위해서 미지원하는 Android 8 과 타 Android 9를 함께 동작 해보았습니다.
테스트 결과는 당연히 Android 8은 Fail (예상된 결과)이었고, Android 9를 포함해 제 기기와 유사한 Galaxy S9은 Pass였습니다. 엇. 이건 왜? 내 것만 안되는데..
4. AWS가 테스트 결과 리뷰
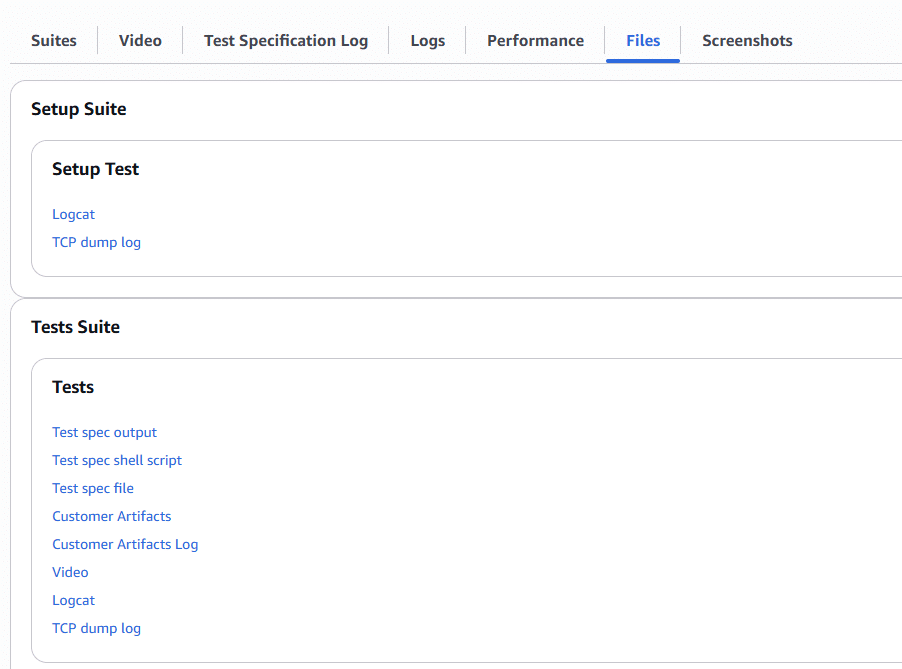
AWS는 꽤 많은 테스트 결과를 제공합니다. 특히 TCP Dump는 환경 구축이나 사용이 번거로운데, 이것도 지원해줍니다. 화면도 우측처럼 동영상 캡쳐를 해주고요. 로그인 테스트만 한건데, 동작을 잘합니다. 여기서 부터 혼란이 시작됐습니다. 왜 내 것만 안되는 거지?
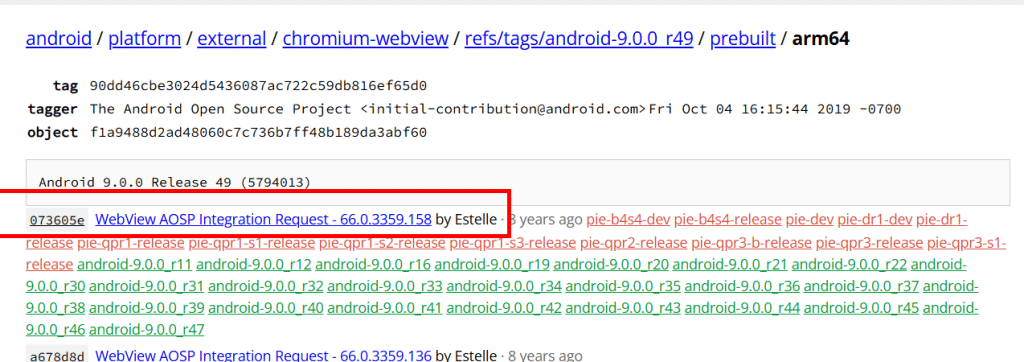
5. 원인 발견: WebView 버전 그렇다면 OS 버젼이 아니라, WebView 버전이 문제인가 하는 생각이 들어 확인해보니, AWS Farm은 높은 버젼의 WebView이고, S9+는 81 버전 이었습니다.
webview 를 업데이트 한후에는 tving 이 정상적으로 로그인 및 사용이 가능 합니다.
6. WebView 호환성 문제와 앱 완성도 WebView 버전이 문제라면.. Android 9은 지원했으니TVING 앱은 Test Pass 일까? Android 9은 최초에 WebView 버전 66에서 시작했습니다. 그러니까 81이면 삼성에서 업데이트해서 출시해 준 것입니다. WebView가 자동 업데이트가 되긴 하지만, 저처럼 자동으로 안 되는 경우도 있습니다. 완성도 있는 앱이라면, Android9과 같이 출시된 WebView에서 동작이 되거나, 최소한 WebView 업데이트하라고 안내해줬으면 좋았을 것입니다. 하이브리드 앱인 쿠팡등이 정상적으로 로그인을 잘한것을 보면..
사용자가 원하는 것은 이런 알림이 아닐까?
이렇게 알려줘야 아. 뭐가 이상이 있구나. 하고 이해하고 넘어가지.
또한 Crash Report 수집 및 안내 기능이 있어야 할 것 같습니다. 만약 이번 문제를 TVING에 문의했으면, 아마 이런 대답: “네 저희는 Android 9 지원합니다. 고객님 환경문제로 보입니다.” 실제로는 Android 9을 지원하니까요. 하지만 실제 원인은 TVING 앱의 WebView 처리 문제였습니다.
좋은 앱이라면 Crash Report를 수집해서 어떤 환경에서 문제가 발생했는지 분석해야 합니다. 오류 메시지라도 표시하거나, 다양한 기기와 OS 버전에서 테스트를 했어야 했습니다. “Android 9 지원”이라는 것은 단순히 OS 버전(API)만 의미하는 것이 아니라, 그 OS 버전의 다양한 환경까지 고려해야 합니다.
7. AWS Device Farm 사용 후기 – AWS Device Farm은 정말 훌륭합니다. 여러 제조사(삼성, LG, 구글 등)의 다양한 기기에서 테스트할 수 있습니다. 특정 제조사의 커스텀 UI 영향도 확인할 수 있습니다. – 속도도 꽤 빠르고, 이 수준의 인프라를 구축하려면 (핸드폰 관리, 연결 유지, 비디오, TCP dump 등) 꽤 많은 비용이 듭니다. 특히 테스트 결과 UX가 상당히 현대적이어서 좋습니다 – 아쉬운 점이 있다면, Xiaomi, Sony까지는 있지만 OPPO 등 다른 브랜드 제품도 지원했으면 합니다. – AWS Device Farm에서 로그인 테스트를 하면 아래처럼 메일이 옵니다. 여러 장비를 동시에 돌리니 엄청난 퍼펙트 스톰 메일이 쏟아집니다.
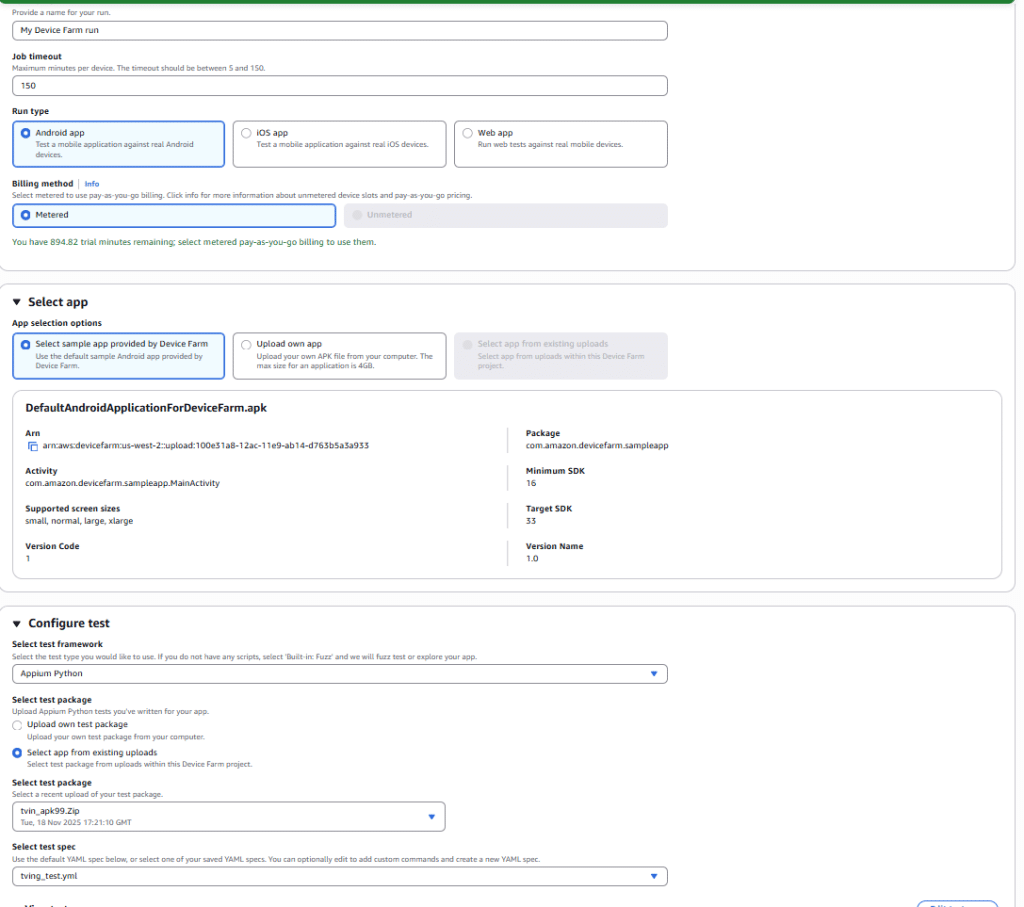
8. AWS Device Farm 설정 방법 아래는 AWS 설정 부분입니다. 간단히 클릭만 하면 됩니다. 테스트 코드와 APK만 업로드하면 바로 테스트가 시작됩니다. 안드로이드는 약 100개 정도의 모델이 지원됩니다.
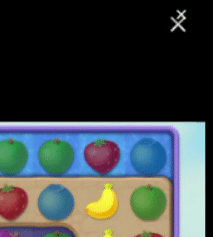
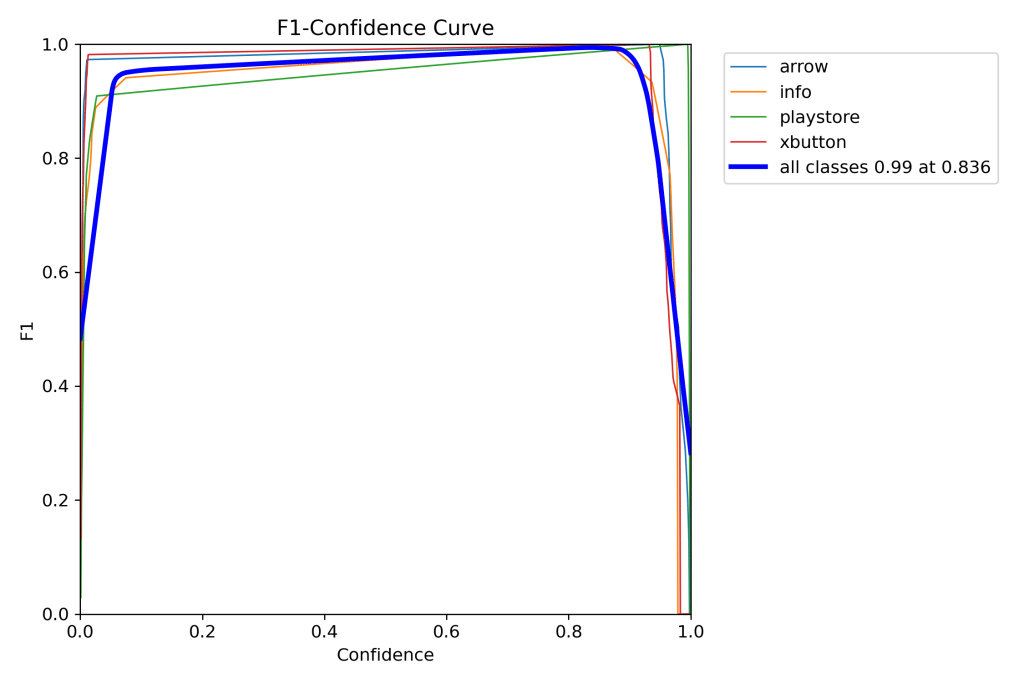
YOLO를 이용한 button 찾기를 Fail할때, LLM (GPT) API를 이용해서 Button 찾기를 수행했었습니다. 그러나 최근에 Fail 발생이 늘어났습니다. 그 이유는 왼쪽과 같이 Fake X 버튼이 생겼기 때문입니다. 아직 이 문제는 해결하지 못했지만, LLM 쿼리가 많아져 로컬 LLM의 도입이 필요 해졌습니다.
기존 LLM 기반 접근과 한계
처음에는 화면 구성 XML을 가지고 위치를 추측하려고 했으나, XML로는 추측이 불가능했습니다. 모든 요소들이 description 이나 무슨 목적의 component 인지 hint가 모두 막혀 있었습니다.
VLM 으로 전환 – Basemodel Test Qwen3-VL 은 VLM 분야에서 유명한 모델이라 검증 대상으로 선택 했습니다.
Prompt -A <|im_start|>system You are a helpful mobile UI expert that analyzes app screenshots. Your task is to locate the close or skip button in advertisements. <|im_end|> <|im_start|>user Look at the image and return ONLY a JSON object in this exact schema: { “x”: , “y”: , “confidence”: <0.0~1.0>, } Rules:
Coordinates are absolute pixels (origin top-left)
Respond ONLY with valid JSON (no explanations)
<|image_pad|> Where should I click to close the advertisement? <|im_end|> <|im_start|>assistant
Prompt – B <|im_start|>system You are a helpful mobile UI expert. <|im_end|> <|im_start|>user <|image_pad|> Find the close or skip button in the advertisement and return JSON coordinates. <|im_end|> <|im_start|>assistant
위와 같은 두개의 Prompt를 이용했고, 각각의 Token수는 119개, 37개 입니다.
BaseModel의 테스트 결과
Prompt – A { “x”: 848, “y”: 620, “confidence”: 0.97 } Prompt -B “`json [ {“bbox_2d”: [775, 825, 999, 900], “label”: “close or skip button in the advertisement”} ] “`
결과를 보면 긴 Prompt와 짧은 Prompt 간의 출력 차이가 있습니다.
3. 데이터셋 구성 – 기존에 ChatGPT API를 이용했던 Fail 케이스를 모아놓았던 것을 이용했습니다. – Input 이미지와, x,y 좌표와 reason 으로 구성되었습니다. – 관련 내용은 기존 blog 참고 – https://flywithu.com/archives/8063
4. 파인 튜닝 – Colab은 최대 세션이 4~5 시간으로, 긴 학습엔 적합하지 않았습니다. – 차선책으로 https://lightning.ai/ 를 이용했으며, 한달 기준 Colab 보다 GPU사용량은 적지만 연속 이용이 가능했습니다.
5. 실험 결과 (CPU 입니다. GPU사용시 2~3s걸립니다.)
항목
Fine – Prompt B
Base – Prompt B
Base – Prompt A
JSON 완성도
Pass (100%)
Fail
Pass(Markdown JSON)
in_tok / out_tok
37/23
37/51
119/33
속도
66s
80s
73s
--- Fine-Tuned Model + Short Prompt B
The following generation flags are not valid and may be ignored: ['temperature', 'top_p', 'top_k']. Set `TRANSFORMERS_VERBOSITY=info` for more details.
[debug] Raw model output:
system
You are a helpful mobile UI expert.
user

Find the close or skip button in the advertisement and return JSON coordinates.
assistant
{"x": 80, "y": 58, "confidence": 1.0}

x=80, y=58, time=66.193s , in_tok=37, out_tok=23

--- Baseline Model + Short Prompt B
[debug] Raw model output:
system
You are a helpful mobile UI expert.
user

Find the close or skip button in the advertisement and return JSON coordinates.
assistant
```json
[
  {
    "x": 50,
    "y": 35,
    "width": 100,
    "height": 50,
    "label": "skip"
  }
]
```

x=50, y=35, time=80.670s , in_tok=37, out_tok=51

--- Baseline Model + Long Prompt A
[debug] Raw model output:
system
You are a helpful mobile UI expert that analyzes app screenshots.
Your task is to locate the close or skip button in advertisements.
user
Look at the image and return ONLY a JSON object in this exact schema:
{
  "x": <integer pixel x>,
  "y": <integer pixel y>,
  "confidence": <0.0~1.0>,
}
Rules:
- Coordinates are absolute pixels (origin top-left)
- Respond ONLY with valid JSON (no explanations)


Where should I click to close the advertisement?
assistant
```json
{
  "x": 50,
  "y": 40,
  "confidence": 0.98
}
```

x=50, y=40, time=73.148s , in_tok=119, out_tok=33
6. 결론 파인튜닝을 통해 Task 내제화 -> 안정적 출력 지나치게 긴 Prompt 제거 -> 토큰 감소, Decode 비용 감소, 속도 향상 장기간 학습에는 Lighting.ai 고려 필요
ShortCha의 광고 영상을 d.screenshot으로 캡처할 때, 왼쪽과 같이 화면 전체가 검은색으로 캡처되는 경우가 있습니다. 그 이유는 일반적으로 window에 secure flag가 있거나, 오버레이 화면에서 발생했습니다. 이렇게 검은색으로 캡처되면, YOLO에서 “X” 좌표를 찾지 못해 광고 SKIP이 Fail 하는 경우가 발생했습니다. 특히 최근에 더 자주 발생하고 있습니다. 사실 안드로이드를 커스텀으로 빌드해서 사용하기 때문에, 프레임워크에서 해결할수도 있었지만, 다른 환경에서도 쉽게 적용 할수 있는 방법을 찾기로 했습니다.
2. 해결 방법 – 우회 방법
스크린샷을 사용하는 것은 불가능하지만, 스크린 레코딩은 가능했습니다. Shortcha에서 테스트 할 때도 가능했습니다.
아래와 같이 구현했습니다.
a. 짧은 화면 녹화 -> 녹화된 영상에서 1frame 추출 -> 기존 screenshot 처럼 return
3. 결과 – 문제 해결
영상의 품질은 조금 저하되지만, YOLO에서 인식에는 전혀 문제가 없이 버튼들이 인식됩니다.
아래와 같이 육안으로 보면 둘 사이에 차이가 크지 않습니다.
d.screenshot
video frame capture
동영상 캡처 구현 – 다음은 Python 코드입니다. safe_screenshot은 기존의 스크린샷 코드이고, capture_android_frame()은 동영상 녹화 후 1프레임을 추출하는 함수입니다. (Linux 기준)
def safe_screenshot(d):
    """uiautomator2 → adb fallback screenshot"""
    try:
        img = d.screenshot(format="pillow")
        if not img.getbbox():
            raise ValueError("Black screen detected.")
        return img
    except Exception as e:
        print(f"⚠️ fallback to adb screencap: {e}")
        img = capture_android_frame()
        if img is not None:
            return img
        raise ValueError("Failed to capture screenshot.")
Code
import subprocess
import numpy as np
import cv2
import time
import signal
import sys
import threading
import os
from PIL import Image

def capture_android_frame(
    output_jpg="frame.jpg",
    tmp_video="/tmp/frame.mp4",
    width=1080,
    height=1920,
    fps=30,
    duration=2.0,
    record_format="mp4",
    cleanup=True,
):
    # Remove existing temporary file
    if os.path.exists(tmp_video):
        os.remove(tmp_video)

    print(f"[info] Starting scrcpy capture ({record_format})...")
    scrcpy = subprocess.Popen(
        [
            "scrcpy",
            "--no-display",
            "--record", tmp_video,
            "--record-format", record_format,
            "-m", str(height),
            "--max-fps", str(fps),
        ],
        stdout=subprocess.PIPE,
        stderr=subprocess.PIPE,
        bufsize=10**8,
        text=True,
    )

    # Thread to print scrcpy logs in real time
    def read_logs(pipe):
        for line in iter(pipe.readline, ''):
            sys.stdout.write(f"[scrcpy] {line}")
        pipe.close()

    log_thread = threading.Thread(target=read_logs, args=(scrcpy.stderr,))
    log_thread.daemon = True
    log_thread.start()

    # Wait for scrcpy to start and capture a few frames
    time.sleep(duration)

    # Gracefully stop scrcpy recording
    scrcpy.send_signal(signal.SIGINT)
    log_thread.join(timeout=1.0)
    scrcpy.wait()

    # Verify that the video was created
    if not os.path.exists(tmp_video) or os.path.getsize(tmp_video) < 5000:
        raise RuntimeError("⚠️ Recording failed — no video created")

    print(f"✅ Recorded temporary stream: {tmp_video} ({os.path.getsize(tmp_video)/1024:.1f} KB)")

    # Extract one frame using ffmpeg
    subprocess.run(
        [
            "ffmpeg",
            "-y",
            "-loglevel", "error",
            "-i", tmp_video,
            "-frames:v", "1",
            output_jpg,
        ],
        check=True,
    )

    # Load the frame using OpenCV
    frame = cv2.imread(output_jpg)
    if frame is None:
        raise RuntimeError("⚠️ Failed to decode frame")

    # Convert to Pillow Image before returning
    img = Image.fromarray(cv2.cvtColor(frame, cv2.COLOR_BGR2RGB))
    print(f"✅ Saved frame: {output_jpg} ({frame.shape[1]}x{frame.shape[0]})")

    # Optionally delete the temporary video
    if cleanup:
        os.remove(tmp_video)

    return img

if __name__ == "__main__":
    img = capture_android_frame(
        output_jpg="frame.jpg",
        tmp_video="/tmp/frame.mp4",
        duration=2.5,
        record_format="mp4",
    )
    print(f"[done] Captured image size: {img.size}")  # (width, height)
1분 내외의 짧은 영상이 30~60편 정도 올라와 있더라고요. 짧게 시간 날 때 보기 딱 좋은 구성인데, 구독료가 엄청나더군요.
구독 가격을 보니, 한 주에 2만원…..
다른 OTT 서비스는 이미 월 1~2만원으로 구독하고 있어서, 이 가격까지 추가로 부담하긴 어렵더라구요. 그래서 어쩔 수 없이 광고 보고 무료로 사용하는 쪽을 선택했습니다.
ShortCha는 ‘젤리’라는 포인트로 에피소드를 볼 수 있는데, 광고를 보면 젤리를 모을 수 있어요. 그런데 여기서 문제가 있었습니다. 1분짜리 짧은 에피소드를 보려면 3~4분짜리 광고를 봐야 하는 거죠. (짧은 광고도 있지만, 계속 광고를 보다 보면 긴 광고가 보이는 시스템인것 같습니다. ) 이건 ROI(Return On Investment)가..
그래서 . “자동화 봇을 만들어볼까?”
처음에는 광고의 X버튼을 직접 클릭하려고 했어요. element로 되어 있으면 xpath로 찾을 수 있지만, 영상에 임베디드된 경우도 있더라고요. 그래서 다른 방법을 찾아야 했습니다. 화면을 캡처해서 X버튼을 찾는 방식을 고민하게 되었죠.
“누군가 이미 이런 AI 모델을 만들었을 텐데?” 하고 찾아봤지만, 아쉽게도 찾을 수 없었습니다. 그래서 직접 YOLO를 이용해서 구현하기로 했어요. 처음에는 class 분류 모델을 사용했는데, 닫기 버튼의 위치가 계속 변경되었습니다. 그래서 최종적으로 detection 모델로 변경했습니다.
MODEL_PATH = "best.pt"
model = YOLO(MODEL_PATH)

def yolo_classify(crop_img: Image.Image, side_offset: int) -> Optional[Tuple[str, float, Tuple[int, int, int, int], int]]:
    """Run YOLO on a PIL crop; return a list of (cls_name, conf, (x1,y1,x2,y2), side_offset) for all detections."""
    results = model.predict(source=crop_img, conf=PRED_CONF, save=False, verbose=False)
    detections = []
    for r in results:
        for box in r.boxes:
            cls_id = int(box.cls[0])
            conf = float(box.conf[0])
            x1, y1, x2, y2 = [int(v) for v in box.xyxy[0].tolist()]
            detections.append((model.names[cls_id], conf, (x1, y1, x2, y2), side_offset))
    return detections if detections else None

def _crop_square(img: Image.Image, where: str, ratio: float) -> Tuple[Image.Image, int, int]:
    """Return (crop, x_offset, y_offset) for 'rt' or 'lt' square crops."""
    w, h = img.size
    side = int(min(w, h) * ratio)
    if where == "rt":
        crop = img.crop((w - side, 0, w, side))
        return crop, w - side, 0
    elif where == "lt":
        crop = img.crop((0, 0, side, side))
        return crop, 0, 0
    else:
        raise ValueError("where must be 'rt' or 'lt'")

def detect_and_click_corner(d: u2.Device, where: str = "rt") -> Optional[Tuple[int, int, float]]:
    """
    Crop corner square (right-top or left-top), run YOLO, map to screen coords, click center.
    Returns (cx, cy, conf) or None if no detection.
    """
    img = d.screenshot(format="pillow")
    crop, x_off, y_off = _crop_square(img, where, SCREEN_CROP_RATIO)
    results = yolo_classify(crop, x_off)
    if not results:
        return None
    for class_name, conf, (x1, y1, x2, y2), x_offset in results:
        if class_name in ("xbutton", "arrow"):
            cx = int((x1 + x2) // 2) + x_offset
            cy = int((y1 + y2) // 2) + y_off
            d.click(cx, cy)
            return (class_name, cx, cy, conf)
    return None
이렇게 해서 매일 자동으로 젤리를 모으고, 보고 있는 시리즈는 미리 광고를 다 처리해두면 나중에 광고 없이 한번에 몰아볼 수 있게 했어요.
하지만 YOLO 모델이 항상 완벽한 건 아니었어요. 가끔 닫기 버튼을 찾지 못하는 경우가 있었습니다. 이럴 때를 대비해 fallback 전략을 추가했습니다. YOLO가 실패하면 LLM에게 화면 이미지를 보내서 버튼의 좌표를 불러오는 방식이죠. 이때 캡쳐한 이미지는 나중에 학습 데이터로 활용했습니다.
LLM Query 및 응답 – 예시
응답:
{
  "x": 1040,
  "y": 54,
  "reason": "There is an advertisement overlay on the screen. The 'X' close button is clearly visible at the top-right corner. Clicking at (1040, 54) will close the ad and allow the user to return to the app content."
}

코드

def ask_and_click_by_llm(d, api_url="http://192.168.10.100:4000/v1/chat/completions", api_key="sk-"):
    """
    1. Capture the current screen as an image and get current XML.
    2. Send the screenshot and XML to the LLM endpoint (chat completion).
    3. Receive the recommended click coordinates and reason.
    4. Click the received coordinates.
    5. Save the image, coordinates, and reason to files.
    """
    import datetime
    import json
    import os
    time.sleep(3)
    # 1. Capture screenshot
    img = d.screenshot(format="pillow")
    img_bytes = io.BytesIO()
    img.save(img_bytes, format="PNG")
    img_bytes.seek(0)
    img_b64 = base64.b64encode(img_bytes.read()).decode("utf-8")
    # 2. Get current XML dump as string
    xml_str = d.dump_hierarchy(compressed=True)
    # 3. Prepare OpenAI/LiteLLM chat completion payload
    payload = {
        "model": "azure/gpt-4.1",
        "messages": [
            {
                "role": "system",
                "content": (
                    "You are a UI automation assistant. "
                    "Given a screenshot and XML, suggest the best click position and explain why. "
                    "If the screen contains an advertisement overlay, prioritize clicking a '>>' or 'X' button to skip/close it. "
                    "Respond in JSON: {\"x\": int, \"y\": int, \"reason\": str}"
                )
            },
            {
                "role": "user",
                "content": [
                    {"type": "text", "text": "Here is the current screen and its XML. Where should I click and why?"},
                    {"type": "image_url", "image_url": f"data:image/png;base64,{img_b64}"},
                    {"type": "text", "text": xml_str}
                ]
            }
        ]
    }
    headers = {}
    if api_key:
        headers["Authorization"] = f"Bearer {api_key}"
    try:
        resp = requests.post(api_url, json=payload, headers=headers, timeout=60)
        resp.raise_for_status()
        # Try to extract JSON from LLM response
        content = resp.json()["choices"][0]["message"]["content"]
        # If LLM returns code block, extract JSON part
        if "```json" in content:
            content = content.split("```json")[1].split("```")[0].strip()
        result = json.loads(content)
        x, y = result.get("x"), result.get("y")
        reason = result.get("reason", "")
        print(f"LLM response: click at ({x},{y}), reason: {reason}")
        # 5. Save image, coordinates, and reason to files
        now = datetime.datetime.now().strftime("%Y%m%d_%H%M%S")
        save_dir = "llm_click_log"
        os.makedirs(save_dir, exist_ok=True)
        img_path = os.path.join(save_dir, f"screen_{now}.png")
        info_path = os.path.join(save_dir, f"info_{now}.json")
        xml_path =  os.path.join(save_dir, f"xml_{now}.xml")
        img.save(img_path)
        with open(info_path, "w", encoding="utf-8") as f:
            json.dump({"x": x, "y": y, "reason": reason}, f, ensure_ascii=False, indent=2)
        with open(xml_path, "w", encoding="utf-8") as f:
            f.write(xml_str)
        print(f"Saved screenshot to {img_path}")
        print(f"Saved click info to {info_path}")
        if x is not None and y is not None:
            d.click(int(x), int(y))
            print(f"Clicked at: ({x},{y})")
            return (x, y, reason)
        else:
            print("No coordinates received from LLM.")
            return None
    except Exception as e:
        print(f"LLM API request failed: {e}")
        return None
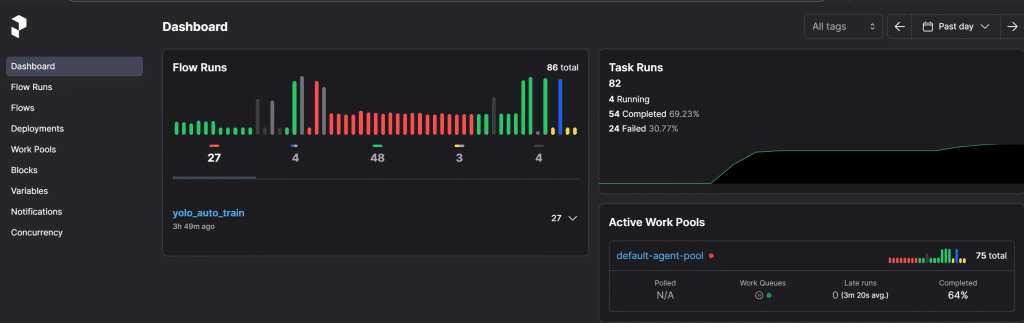
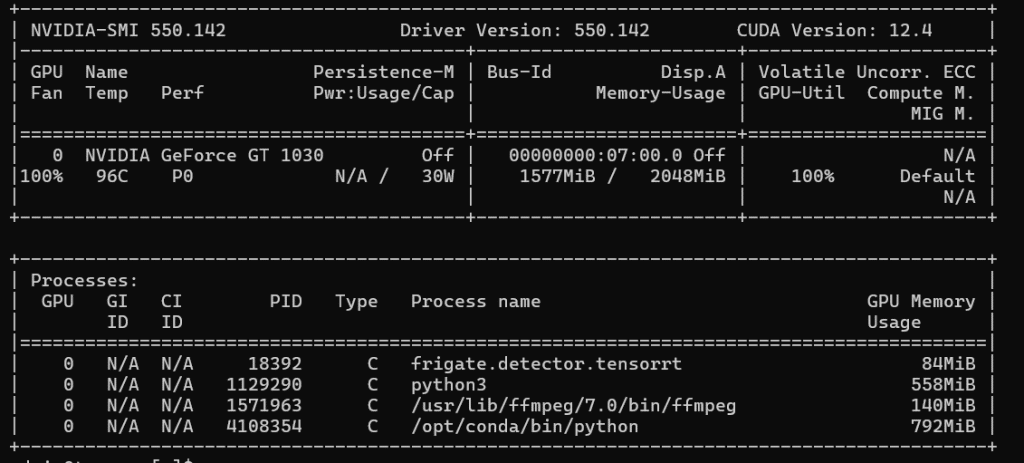
이 과정을 좀 더 체계적으로 관리하고 싶었어요. 그래서 Prefect를 설치해서 CI/CD 파이프라인을 구축했습니다. 단순한 이미지 학습인데도 CPU로는 60분이나 걸리더라고요. 그래서 NAS의 GPU를 활용하기로 했습니다. 고성능은 아니지만… 없는 것보다는 훨씬 나으니까요.
위 코드를 보면 알겠지만, 코드는 대부분 CoPilot 으로 작성했습니다. 실제로 직접 코딩하는 시간보다 모델을 학습 시키는 시간이 월씬 많이 걸렸죠.
봇과 MLOps의 전체 프로세스를 정리하면 다음과 같습니다:
ShortCha에서 광고 보고 젤리 획득하기
보던 시리즈의 새 에피소드 미리 확보하기 (광고 보면서)
YOLO 모델로 화면 캡처 후 닫기 버튼 탐지 및 자동 클릭
YOLO가 버튼을 찾지 못하면 LLM에게 화면 이미지를 보내 좌표 확보
LLM이 처리한 이미지와 데이터를 저장 (학습 데이터로 활용)
확보한 좌표를 클릭하여 미션 완료
저장된 이미지 확인 후 학습 데이터 보정 (여기는 사람이…)
Prefect로 모델 학습 후 YOLO 모델 업데이트
이렇게 해서 YOLO와 LLM을 조합한 자동화 시스템을 만들었고, Prefect로 MLOps 파이프라인까지 구축하니 그럴듯하게 돌아가더라고요. 실패하면 LLM이 보완하고, 그 데이터로 다시 학습하는 구조입니다.
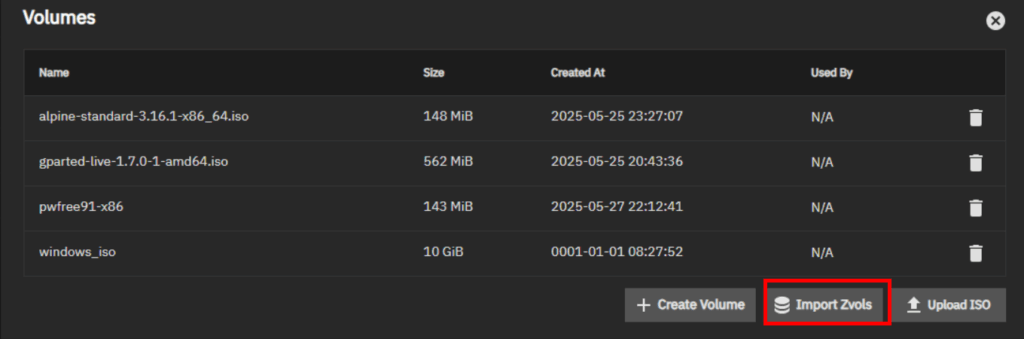
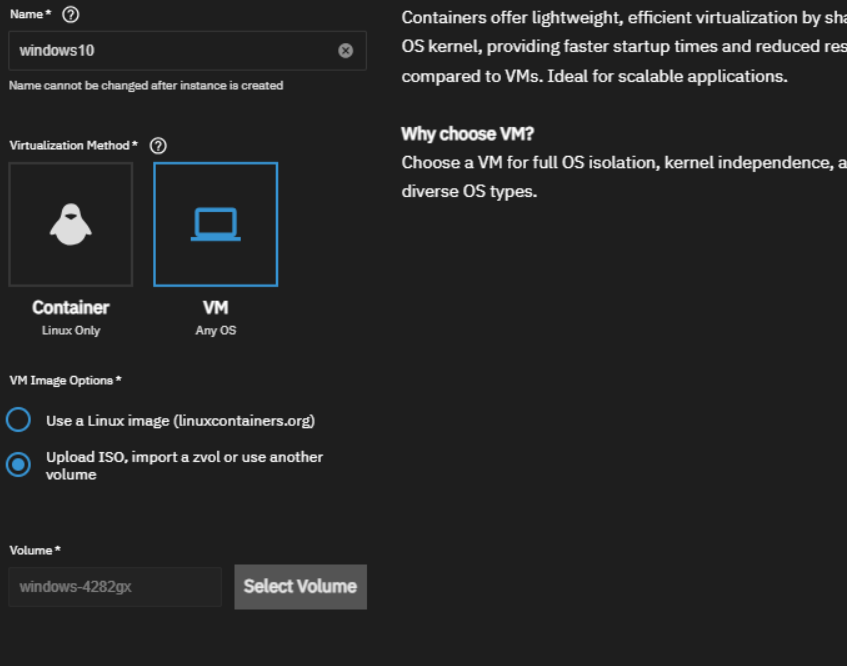
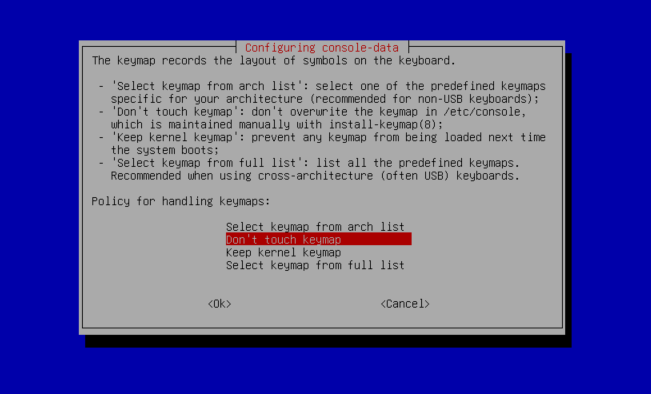
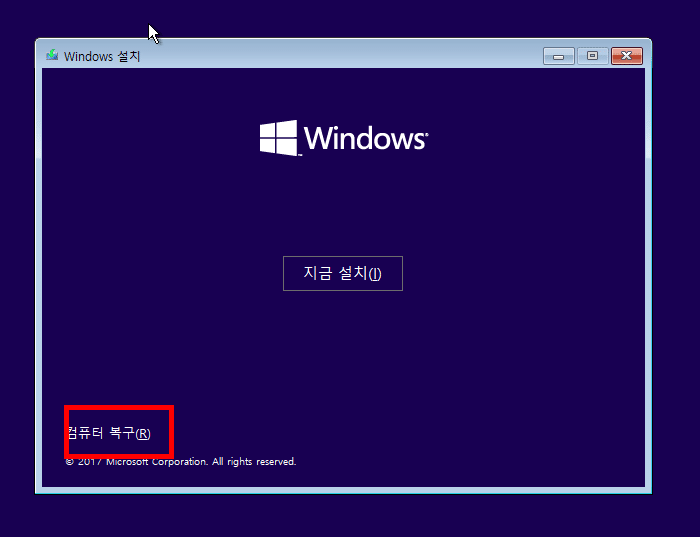
Recently, TrueNas Fangtooth 25.04 was release. The VM system has changed compared to the previous version.
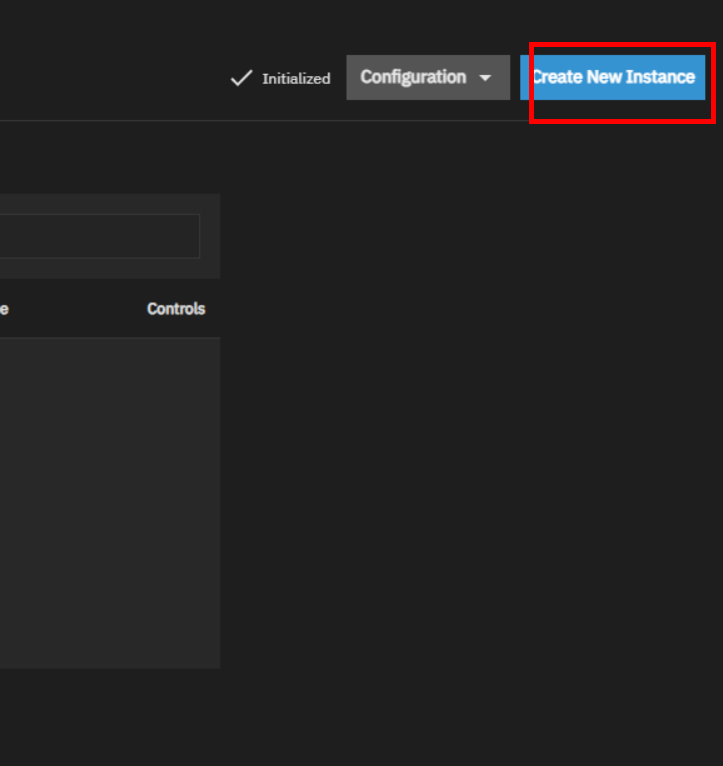
A new ‘Instances’ menu has been introduced for managing virtual machines. If you were using Windows 10 with a prrevious version of TrueNas, you will need to create a new VM.
This document outlines the necesary steps.
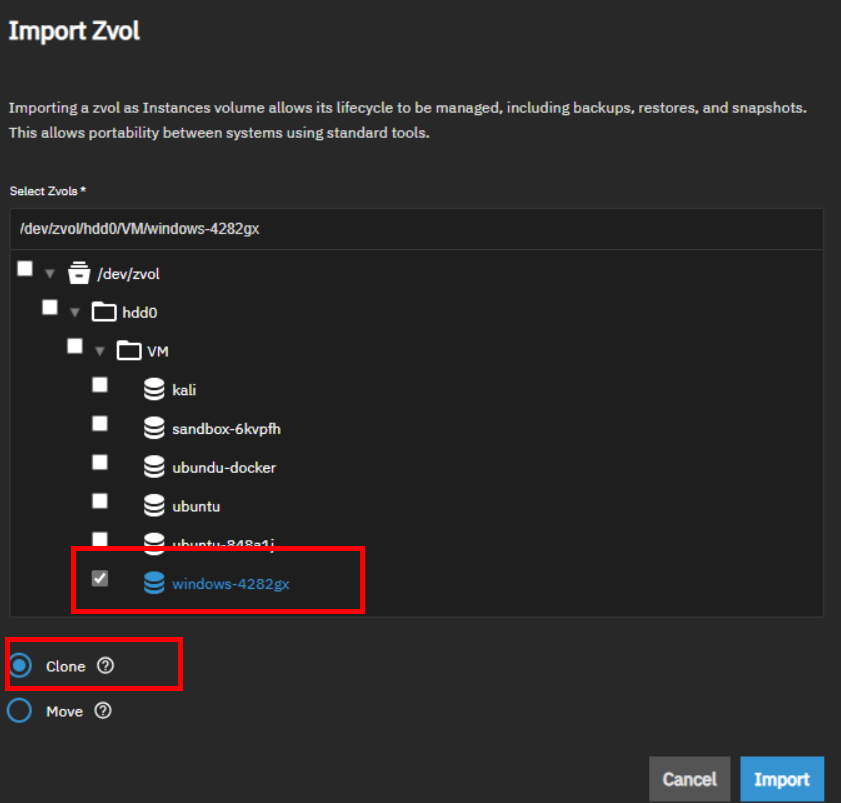
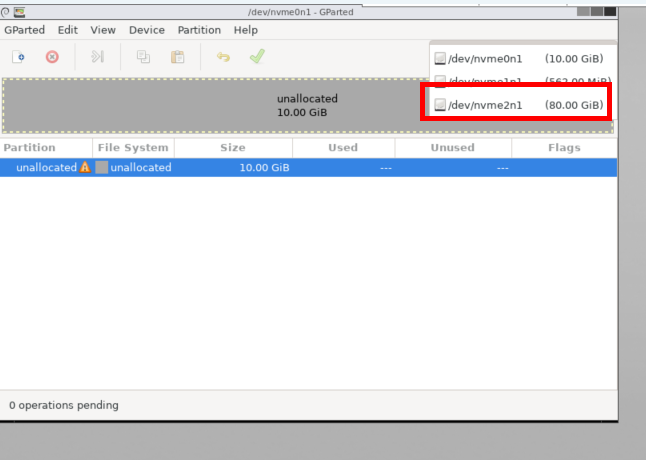
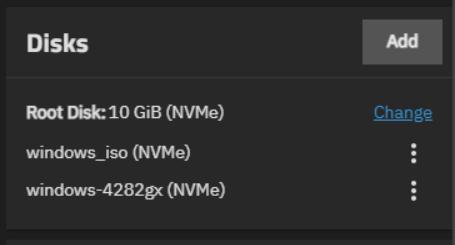
Import Zvols from the previous version. I prefer cloning over moving for data backup.
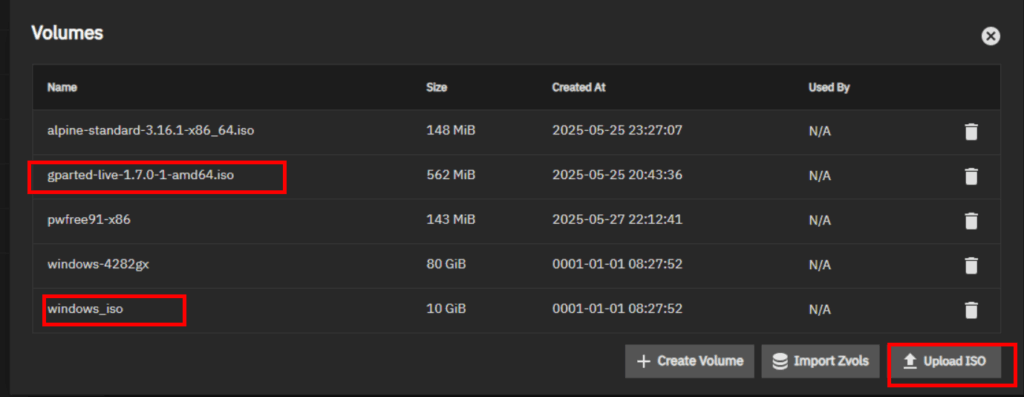
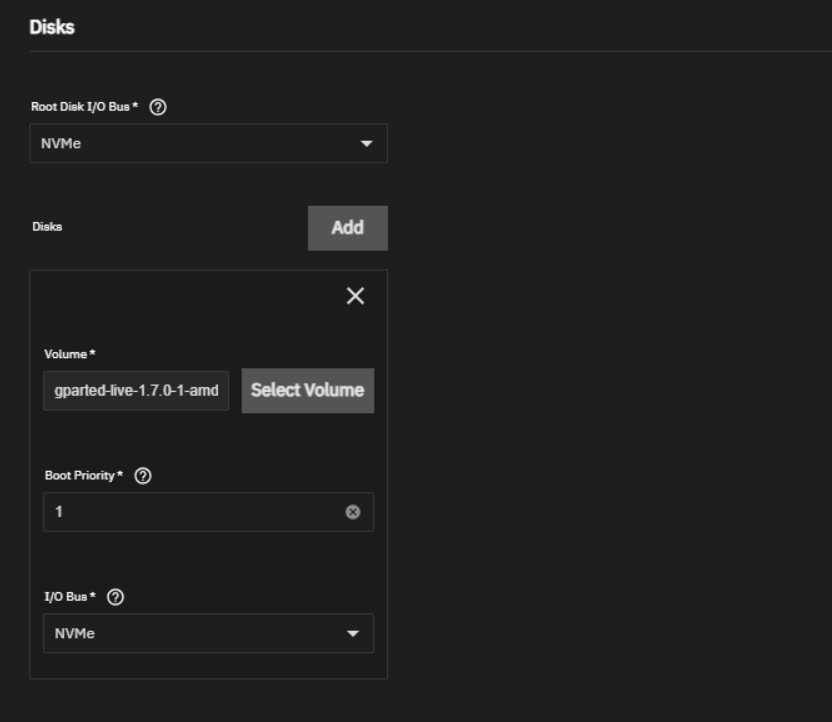
2. I’ve also uplaed GParted and the Windows ISO. In my case, I encounted a timeout error while uploading a large ISO file (Windows). If you experience the same issue, i’ll create another post to address it. Gparted – https://downloads.sourceforge.net/gparted/gparted-live-1.7.0-1-amd64.iso
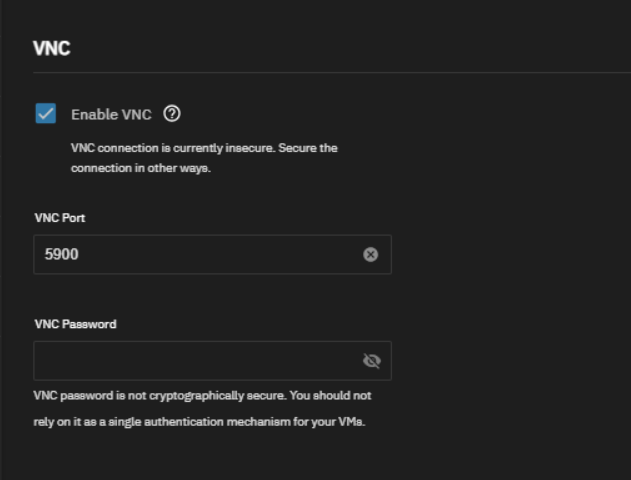
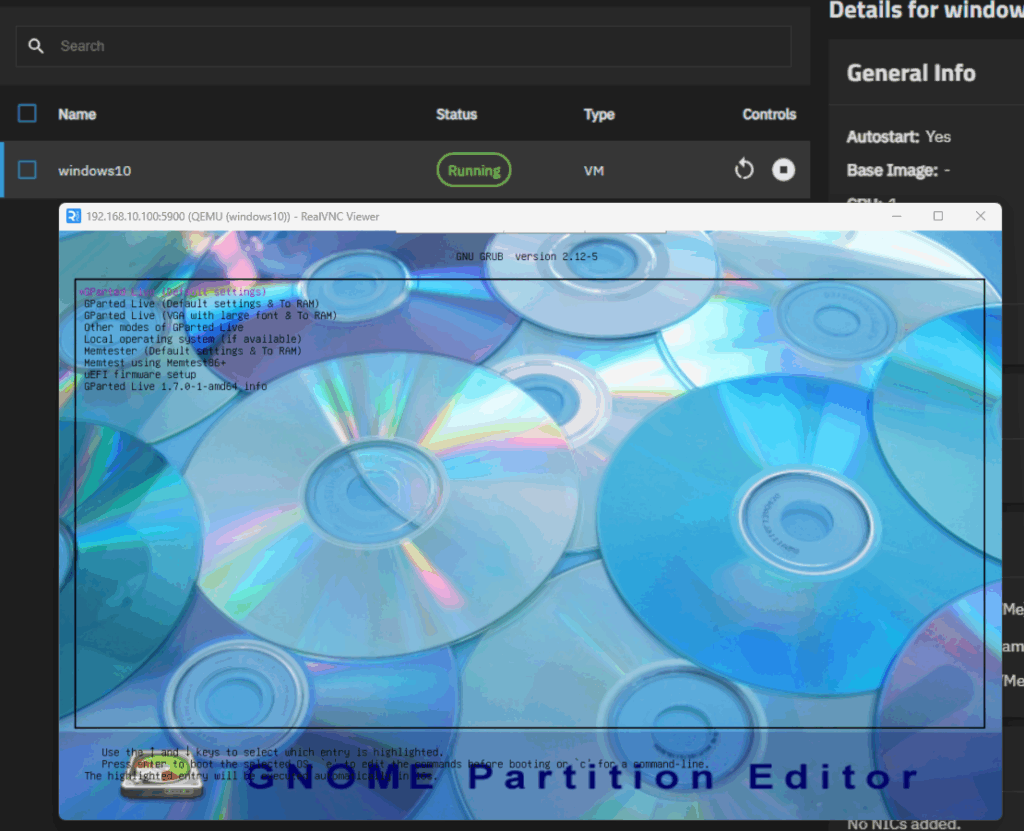
I’ve added the import windows disk, gparted live iso and enable VNC.
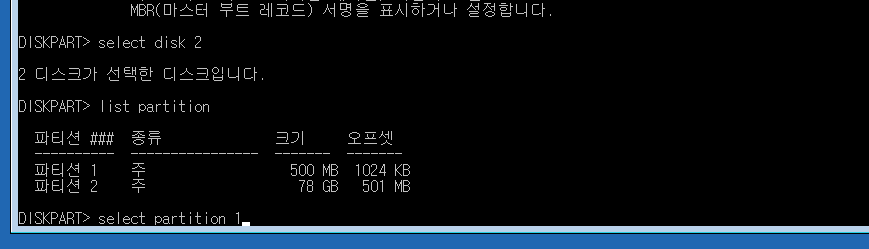
4. Remove unsued paritions and create a new partition. Changed the parition to GPT partition.
You NEED to select the correct disk. I chose it based on the size. This is an important step.
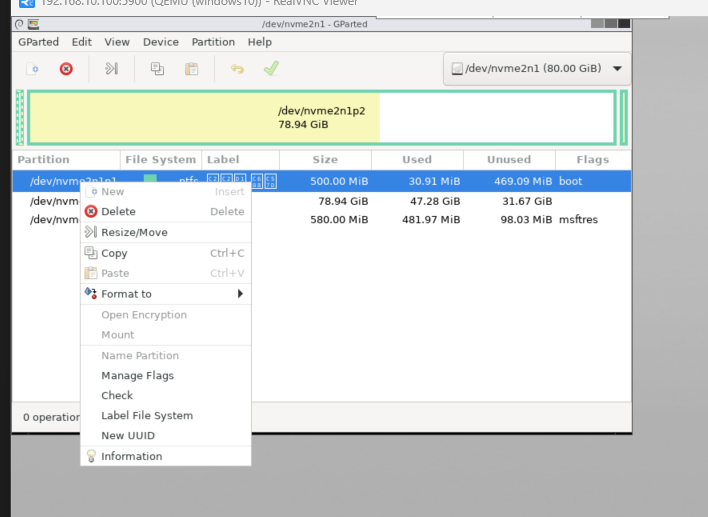
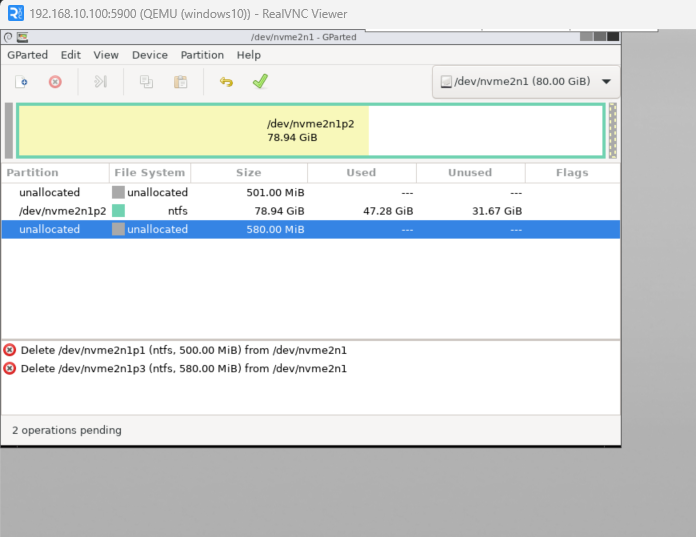
Remove all other partitions excep the main one. In my case, the 78G partion was the windows. I’m not sure what the othere were. The boot partion shoudl be fat32 but in my case, it was NTFS which caused a boot issue.
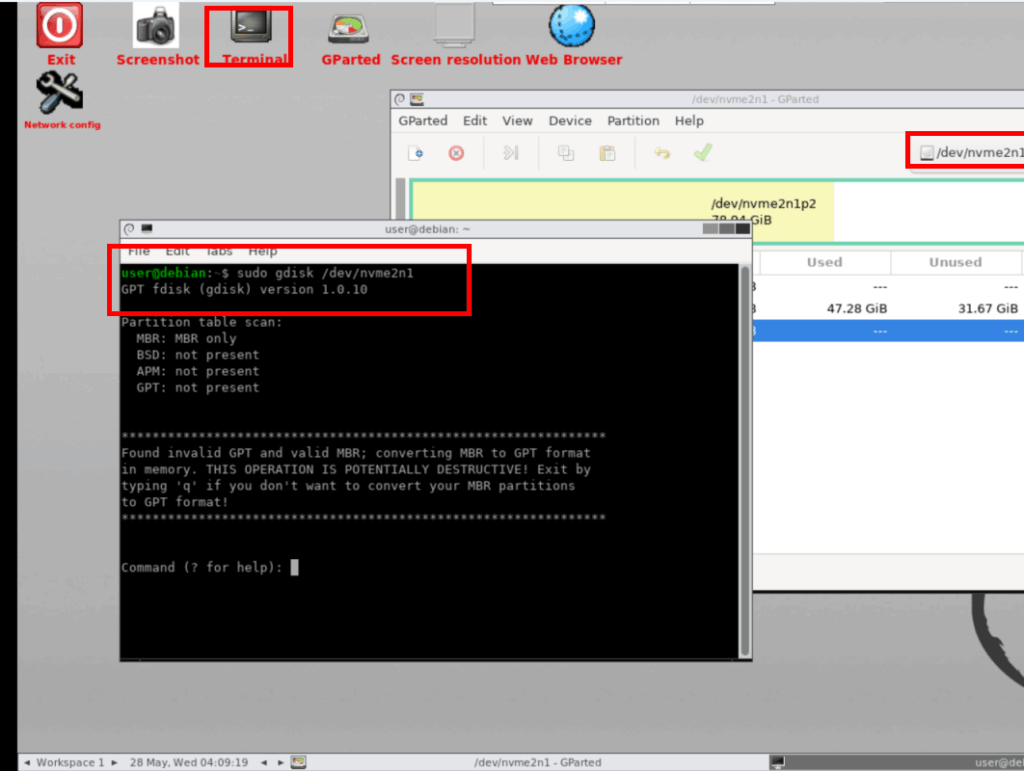
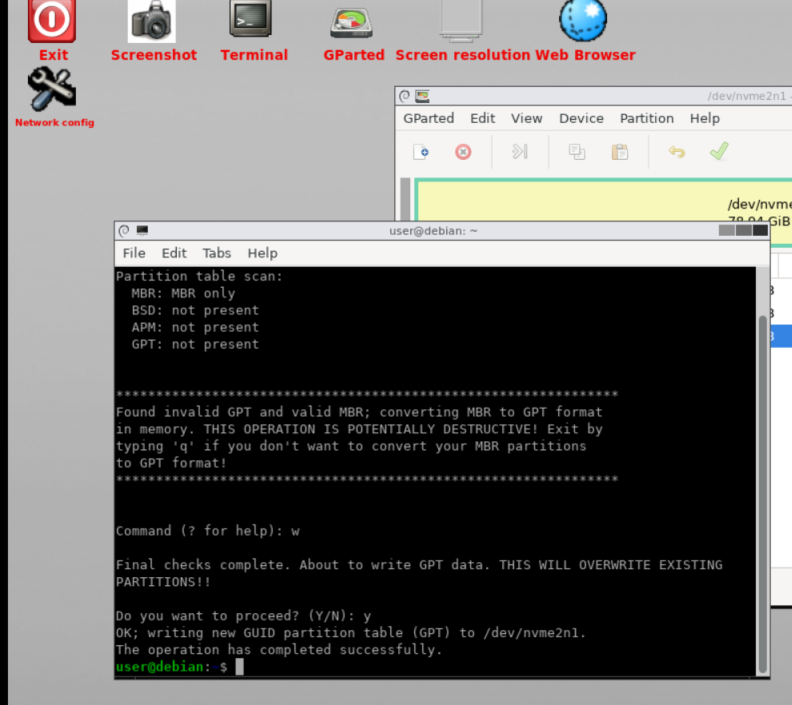
Try to convert the partitions to GPT. – Click Terminal. sudo gdisk /dev/diskname (based on right top side information) w – y . then you can see complete.
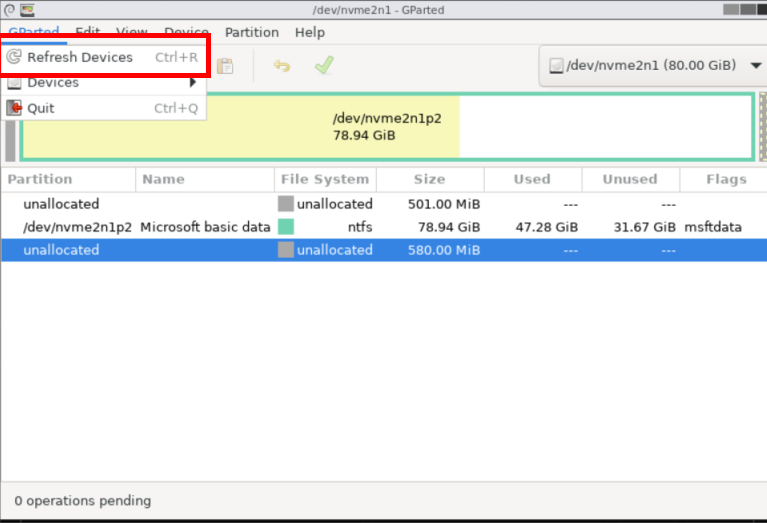
Return to GUI gparted – refresh the devices.
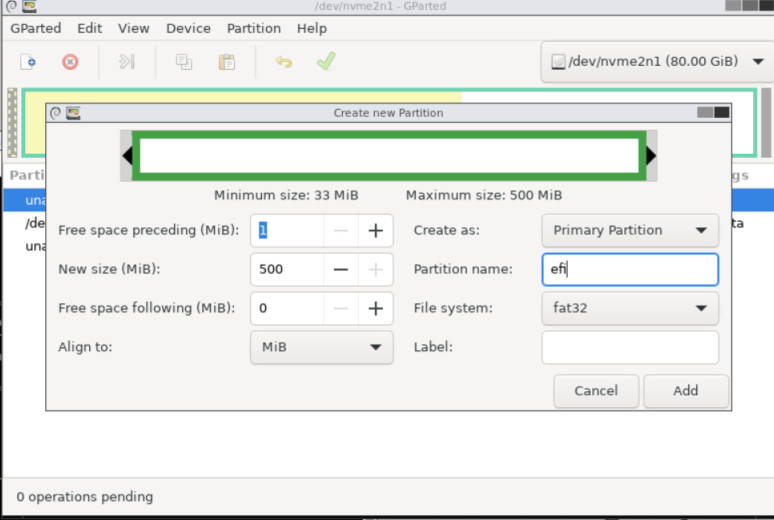
Create a partition EFI and fat32 on first area.
Shutdown the device.
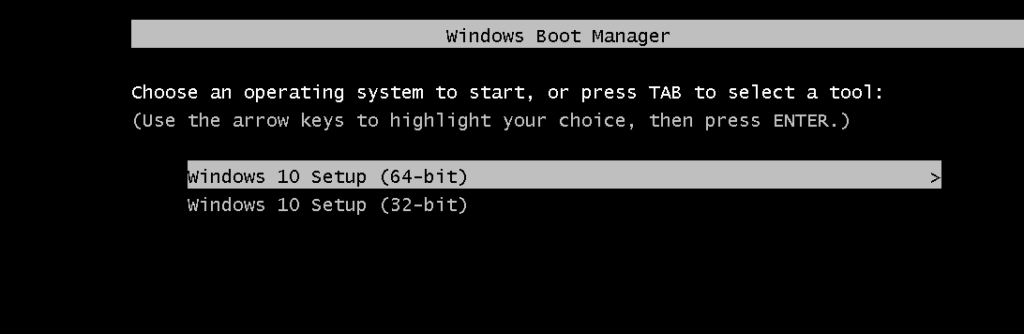
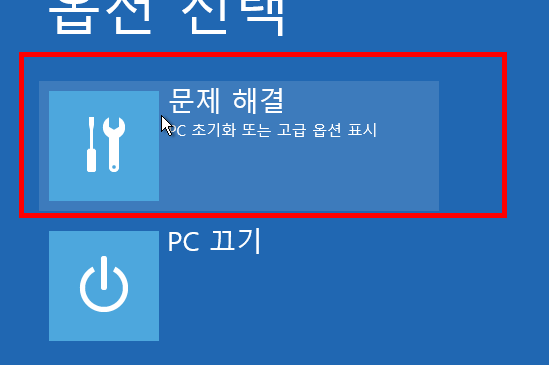
5. Resotre the boot area with windows ISO.
insert the windows_iso
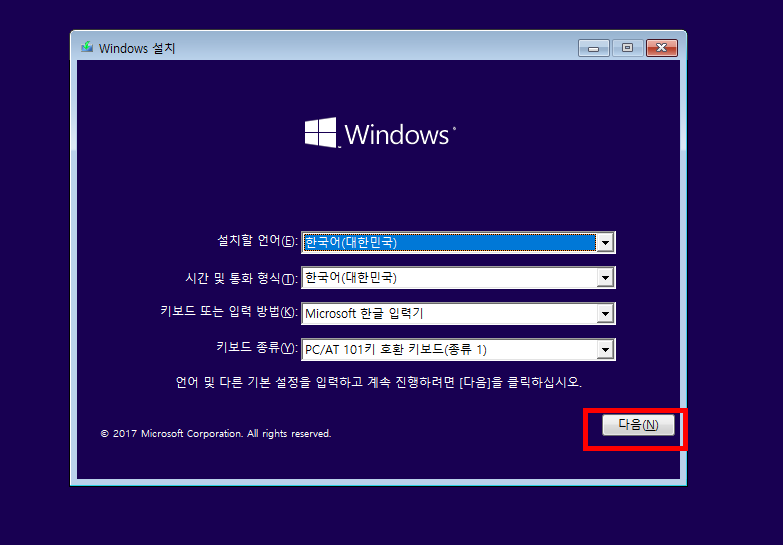
Boot windows 10 Setup.
Below is korean. but you can click same button.
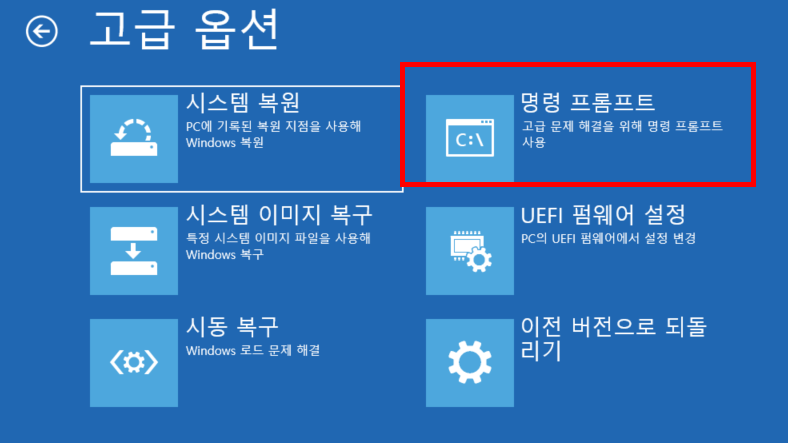
Restore the partition.
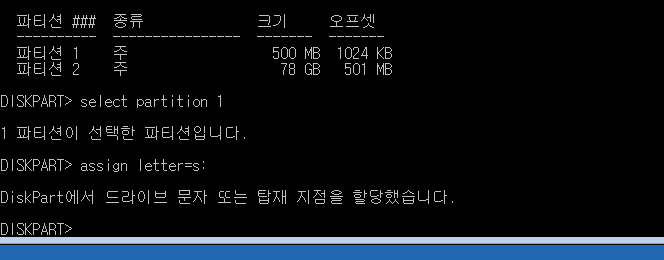
diskpart list disk select disk ? (based on size) list partition select partition 1 assign letter=s
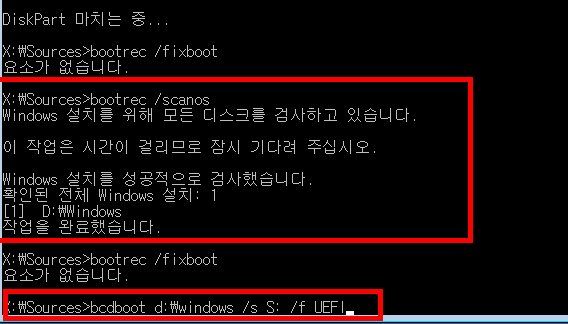
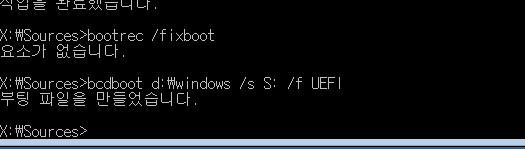
bootrec /scanos bcdboot d:\windows /s S: /f UEFI
DONE! 6. Reboot the device and wait. It may reboot a few times. Eventually, you will see Windows
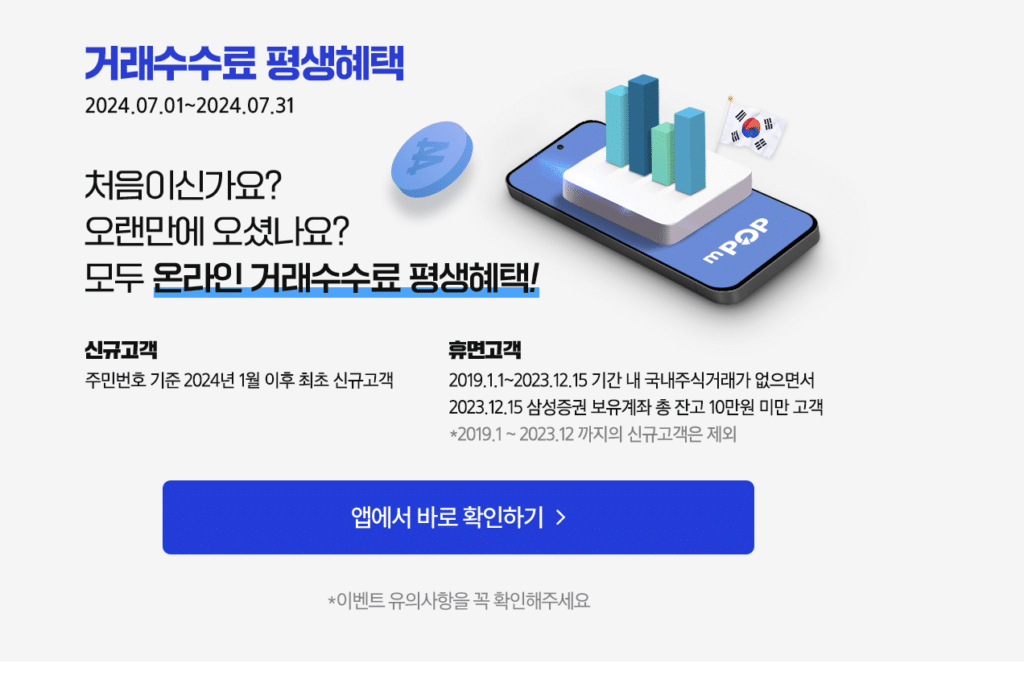
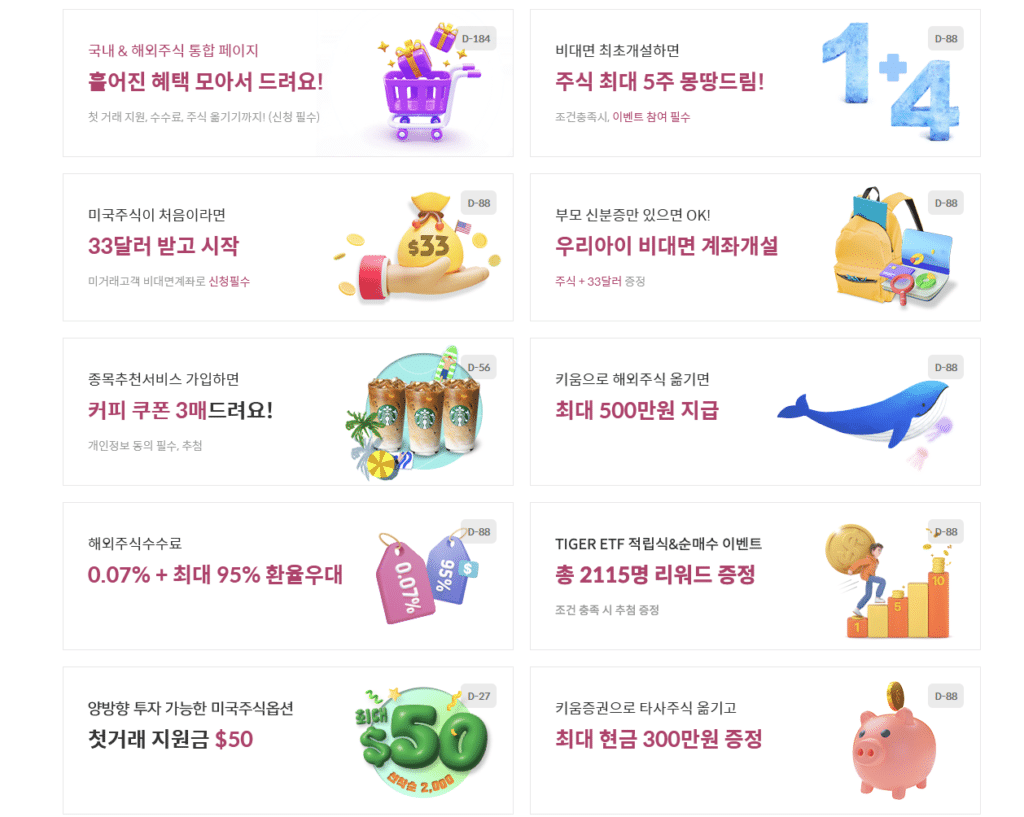
현재 KB증권을 이용중이다.. 나는 혜택이 있지만 HTS (PC거래)시만 적용이 되고, 아이들 계좌는 일반 수수료 (0.25%) 이다.
최근에 KB에서 여러 이벤트도 있길래 좀 어떻게 될꺼가 있나 해서 지점과도 통화 했지만 그냥 증권사를 옮기라고 한다. 그래서 몇 곳을 알아 보고 결정을 했다.
중심으로 둔거는 아이들 계좌이다. 지금 현금 2~3만원 주는 곳은 많은데, ‘평생’ 수수료를 주는 곳으로 택했다.
그래서 삼성증권은 평생 수수료. 0.03%(미국) . 일반적으로 0.25%니깐.. 당장 몇만원 안줘도, 좀 거래 하다보면 이벤트 3만원 정도 효과가 있다. 장기적으로 보면 이것만으로도 충분히 이익이다. 그러나 현재 계좌를 옮기면 그걸로 이벤트를 준다. 결론적으로 보면 평생 + 타행 이동의 경우 가장 좋은 효과를 보여 준다.
아래는 미래에셋 이다. 2만원 기본으로 주고, 주식 거래 하면 2~3만원 정도 추가로 받을수 있을것 같다. 그러나 평생은 아니다.